Tronixlabs DS321 hardware clock config for Rasperberry Pi
02/09/14 11:34 Filed in: Electronics | Devices
For various reasons I need to make a Raspberry Pi into an NTP time server and for this to work I need time to be roughly right when it starts. hence we need to add an RTC to the Raspberry Pi running Raspberian.
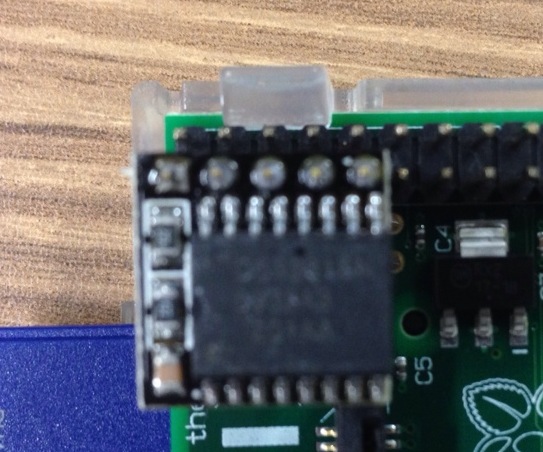
Tronixlabs supplies a very nice module (http://tronixlabs.com/raspberry-pi/real-time-clock/ds321-real-time-clock-module-for-raspberry-pi/) but the instructions are a little less than optimal.
Tronixlabs supplies a very nice module (http://tronixlabs.com/raspberry-pi/real-time-clock/ds321-real-time-clock-module-for-raspberry-pi/) but the instructions are a little less than optimal.
The DS321 is command compatible with the DS1307.
The basic setup of the module is to install the module directly onto the pins of the GPIO header (in this case a Model B) and follow the instructions translated from French on (http://www.pihomeserver.fr/en/2014/03/08/raspberry-pi-home-server-ajouter-une-horloge-rtc-ds1307-sur-le-bus-i2c/)
1. Update the system:
2. Enable the I2C interface by editing the file
4. Restart the Raspberry Pi
5. Install the I2C tools
6. Detect the clock (for Model A x is 0 for Model B x is 1)
The number 68 should appear in the output.
7. Define the device (for Model A x is 0 for Model B x is 1)
8. Read the hardware clock
9. Set the time using the date command
10. Write the hardware clock
We now leave the instructions provided above and focus on getting the clock enabled and used in the init scripts. The default hwclock.sh script cannot be used without recompiling the kernel as the kernel modules are not loaded at the point it runs. So:
-1. Optionally remove fake-hwclock
1. Install an init script that loads, initialises and saves the RTC (/etc/init.d/ds1307.sh)
2. set the links to the default boot order
3. configure (date) and save the time
And we should now have a working RTC clock under a current version of Raspberian
The basic setup of the module is to install the module directly onto the pins of the GPIO header (in this case a Model B) and follow the instructions translated from French on (http://www.pihomeserver.fr/en/2014/03/08/raspberry-pi-home-server-ajouter-une-horloge-rtc-ds1307-sur-le-bus-i2c/)
1. Update the system:
sudo apt-get update && apt-get -y upgrade
2. Enable the I2C interface by editing the file
/etc/modules. Add the following lines at the end of the file: 3. Remove the I2C module from the blacklist. Ini2c-bcm2708
i2c-dev
rtc_ds1307
/etc/modprobe.d/raspi-blacklist.conf comment out blacklist i2c-bcm2708 (add a # to the beginning of the line)#blacklist i2c-bcm2708
4. Restart the Raspberry Pi
sudo reboot
5. Install the I2C tools
sudo apt-get install i2c-tools
6. Detect the clock (for Model A x is 0 for Model B x is 1)
sudo i2cdetect -y x
The number 68 should appear in the output.
7. Define the device (for Model A x is 0 for Model B x is 1)
sudo echo ds1307 0x68 > /sys/class/i2c-adapter/i2c-x/new_device
8. Read the hardware clock
sudo hwclock -r
9. Set the time using the date command
10. Write the hardware clock
sudo hwclock -w
We now leave the instructions provided above and focus on getting the clock enabled and used in the init scripts. The default hwclock.sh script cannot be used without recompiling the kernel as the kernel modules are not loaded at the point it runs. So:
-1. Optionally remove fake-hwclock
sudo apt-get remove fake-hwclock
sudo rm /etc/cron.hourly/fake-hwclock
sudo update-rc.d -f fake-hwclock remove
sudo rm /etc/init.d/fake-hwclock
1. Install an init script that loads, initialises and saves the RTC (/etc/init.d/ds1307.sh)
2. set the links to the default boot order
sudo update-rc.d ds1307.sh defaults
3. configure (date) and save the time
sudo /etc/init.d/ds1307.sh stop
sudo /etc/init.d/ds1307.sh status
And we should now have a working RTC clock under a current version of Raspberian